Followers

Wednesday 20 September 2017

Fun Day at Cow Play Cow Moo

Hey guys, welcome back!
Having midweek stress? Wanna find something to distress? I may have the perfect place for you so do read on.
I am sure some of you have already heard of this hyped up arcade in Suntec City - Cow Play Cow Moo (somehow I think it sounds a lot like KPKB, a Hokkien bad word lol) and I finally took some time off and tried the place out. It was totally awesome!


This arcade is all about winning tickets just like the old school ones we had in the past which unfortunately were mostly closed down. One thing I like about this arcade is that I think the tokens are very reasonably priced. My friend and I changed $10 each and we got 125 tokens for 2 pax. When you do the math, a token is approximately $0.20 (not too bad huh). 


The most expensive game I tried is the basketball shooting one and it cost us 14 tokens which is about $2.40 but you can be guaranteed to play at least 04 rounds because that was the number of rounds we played and we ain't good shooters ourselves lol.
The concept of this arcade is very much like a casino in my opinion since it is all about winning the tickets. There are many games that require luck rather than skills, like the jackpot game, coin dozer etc and most of the time we are taking chances to put in more tokens to win more tickets.

My favourite games in the arcade is definitely the basketball and the animal kingdom.


One can easily spend few hours in the arcade and when you are done with the games, do check out the prize section to see what prizes you can exchange with your tickets. I swear some of the prizes are really attractive.


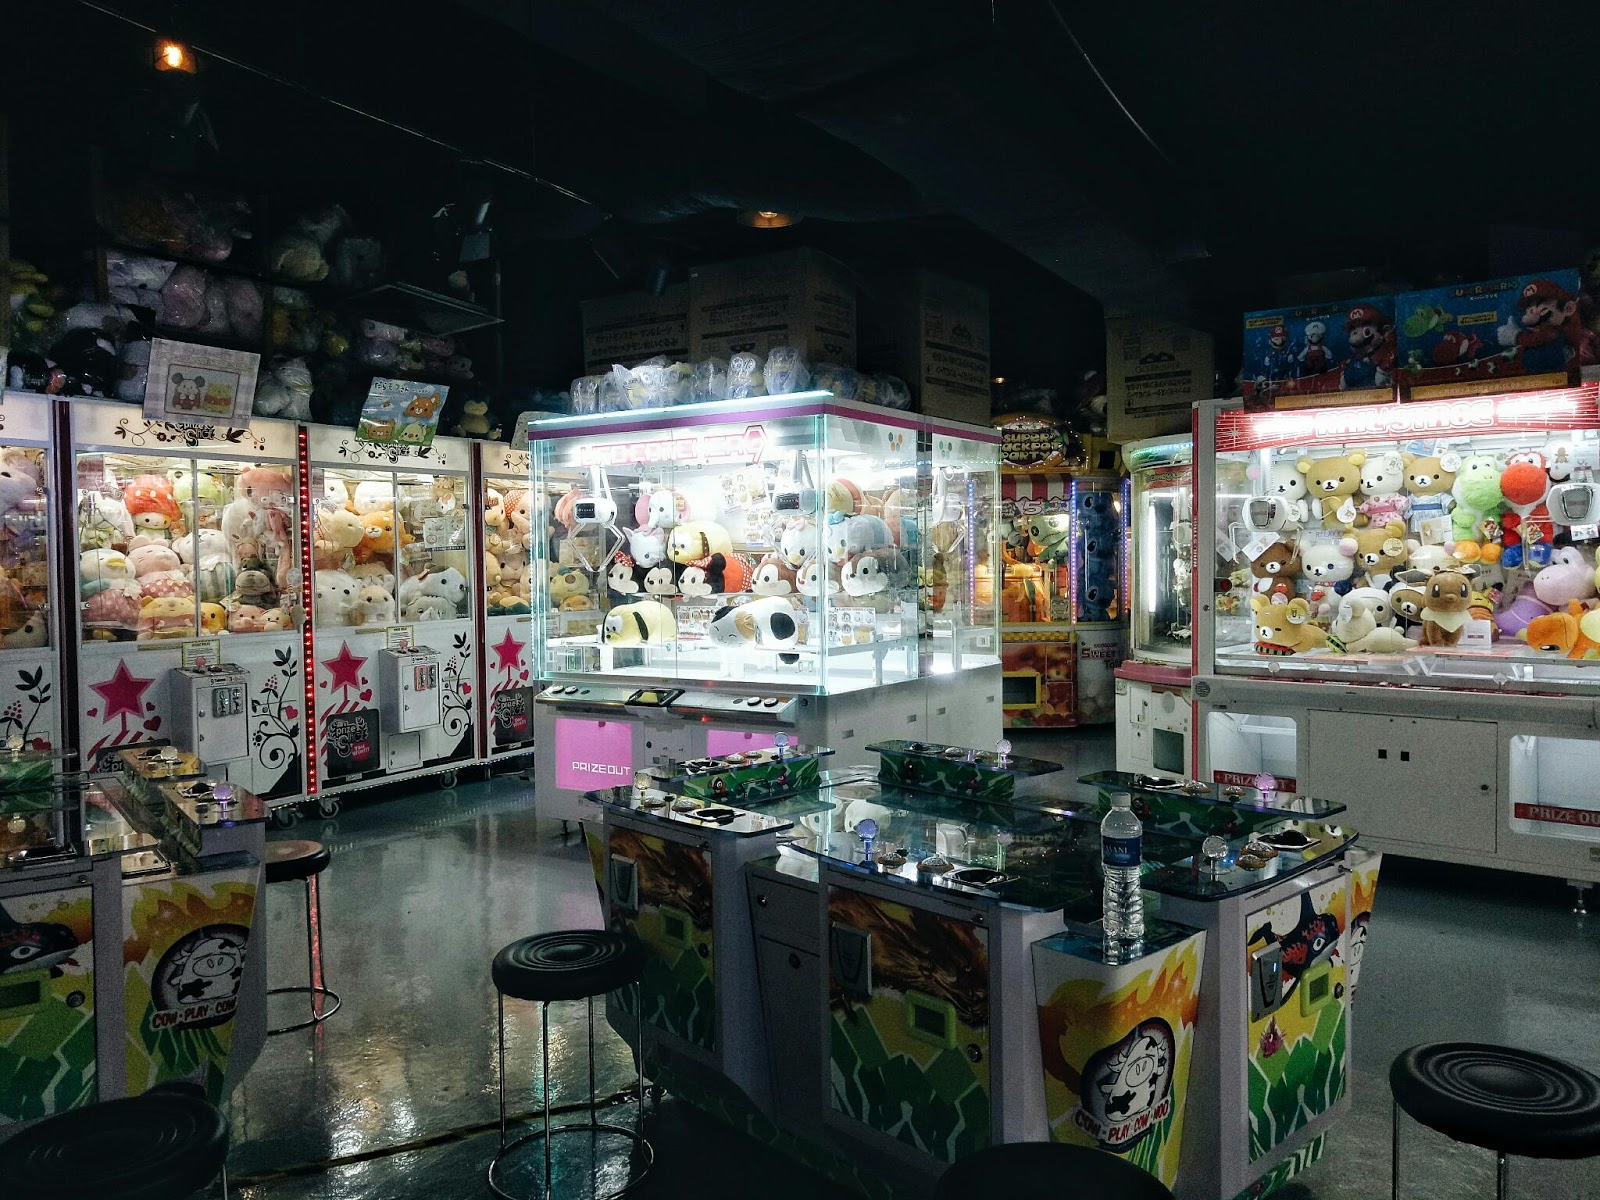
Oh and guys, there are ALOT clawing machines in the arcade as well. So bring your girlfriends over and impress them (hopefully) with your clawing skill!


One thing to take note: Most of the machines are either in Japanese or Chinese and even though there are some English instructions at the side done by the staff, I think it is best for non Chinese friends to go with a Chinese friend.


Address:
Suntec City, East Wing (below Golden Village) #02-719/720
Nearest Mrt Station: Promenade (Downtown/Circle line or City Hall (Red/Green line)


I hope you have enjoyed reading this post and happy playing away!
Xoxo

Sunday 17 September 2017

Current Favourites - Drugstore Blushers

Hey guys, hope your weekend's been going great so far!

I'm currently on my way home from a makeup assignment for a photo shoot so I thought I could share with you some of my current favourite blushers and I got them all from local drugstores which means they are quite pocket-friendly haha. 

Disclaimer: The products are not introduced in order as I love them all the same!

So the first product on my list is the L'Oreal Lucent Magique Mono Blush, which I currently have in two shades - P7 Rose Romance and C4 Earthy Coral. I like how these matte blushers come with a fruity scent that makes them so pleasant to apply on the skin. Also, they have a slight sheen to it and doubles up as a highlight for me. 
I like how they can last on my skin the entire day and I especially love the C4 Earthy Coral as it gives me a natural blush and makes me look extra healthy and glowy. Its soft, melting texture makes it almost impossible to go cakey or chalky. This blusher also comes with a compact mirror and brush, making it perfect for travelling and on-the-go usage! You can find this in all Watson and Guardian stores and they are now retailing at $14.90 each. 


Earthy Coral
The next awesome blusher has got to be the Glow Fleur Cheek by Canmake Tokyo and I got this in 01 Peach Fleur. I love how this blusher doesn't feel powdery on my skin at all even though it is a powder type blush and it sets onto my skin ever so comfortably. The staying power is fantastic as well since it contains sebum-absorbing powder to prevent makeup run. It also comes with a blush brush, which is of good quality unlike other drugstores' blusher brushes that come together with the blusher. To top things off, the Glow Fleur Cheek blusher also contains rosehip oil, which is famous for its anti-ageing benefits and it also has a fruity yet flowery smell due to the presence of Pomegranate flower and Rosa multiflora fruit extracts. These blushers are available at Watson, BHG and Tokyu Hands and they are retailing at $17.90 each. 


Last but not least, the Milani Cosmetics Rose Powder Blush in 01 Romantic Rose is the most expensive of the lot but truth be told, this is worth every single penny. Take a second to look at the packaging shown below and you will know how the name of the blusher came about. The blusher is pressed into the shape of a rose and this was so well done that no matter how hard I swiped with a brush, the shape just stays the same. The pigmentation is great and its soft natural finish complements every skin tone. It is also easy to build and you can easily apply many layers to achieve the tone that you desire. It also blends well with just any kind of foundations, be it cream or liquid. The only thing that I really dislike is that it has a very strong crayon smell and everytime I apply this on my skin, it feels like I am colouring my face with crayon. However, for the colour payoff and pigmentation, I really wouldn't mind smelling crayon all day err day. I got this Milani Cosmetics Rose Powder Blush from Coma Makeup at $16.90 and they also have an extensive range of products from Milani Cosmetics so if you are keen to try this brand out, do check their website out!


And that completes this post on my top favourite drugstore blushers. I hope you have enjoyed reading and happy blushing away. 

Xoxo


Wednesday 13 September 2017

First Impression: Maybelline Clearsmooth All In One BB Stick

Hey guys,  good Wednesday to you!

If you have been following my IG account, you would've known that I recently took a day trip to Johor Bahru for a food + shopping tour! So in today's post I will be doing a first impression/mini review on the Maybelline Clearsmooth All In One BB Stick that I purchased from JB's Watson store for just RM17.99 (approx. SGD6 bucks). 


Well, this is not really a new item but I was very intrigued when I saw that it contains SPF 21 with 3 pluses and I really wanted to try it out even though I have never been a fan of foundation sticks as the ones that I tried previously gave me very bad impression. 

Before I get started, let me share with you a little bit of background on my skin type. I have normal/oily skin and it can get quite oily at my T-zones, which is why I don't usually go for foundation sticks as they can become really oily on my skin and leave my face looking greasy throughout the day. I don't have much breakouts (thank goodness) but I do have really bad dark circles and they are always a challenge to cover. 

There are a total of 2 shades for this BB stick - #01 Fresh and #02 Natural. I personally think Maybelline should really come out with more shades for this BB stick mainly because not everyone falls under these two categories. I got myself the #02 Natural since I am not the fairest girl of them all (so who is it? =P).

This is #02 Natural and it still looks a little fair for my skin colour
I love how this stick glides so smoothly onto my skin, giving it just enough moisture for a dewy look without being too greasy. 


The video above shows how I looked after applying a thin layer of the BB Stick. I think it has pretty good coverage and it doesn't settle into the fine lines of my skin which is a plus point for me.

This is the result after applying a second layer
This BB Stick is definitely buildable and you can apply more than one layer to get that perfect coverage for your skin, doubling as a concealer at the same time. It has a satin finish in my opinion as it is very lightweight yet giving me enough coverage and it makes me feel like I am not putting on any foundation at all. 

I have to admit that I am also pleasantly surprised by its staying power. The video below shows how my face looked like 6 hours after I applied the BB Stick and it looked exactly like how I first applied it. It didn't oxidise much, which means the shade is still the same when I first applied onto my face. Also, the shine control power was amazing! I mentioned earlier that the main reason why I avoided foundation sticks was because they usually left me looking greasy after a while but this Maybelline Clearsmooth All In One BB Stick did not do that at all! I looked slightly dewier with a little shine just enough to make me look perfectly glowy and healthy. 


Not too bad huh

So to my surprise, I absolutely adore this Maybelline Clearsmooth All In One BB Stick as it gives me enough coverage to use this alone for those lazy days. It also has great staying and shine control power. I can already foresee myself using this all day, err day.

Maybelline, if you are reading this (hopefully you are haha), please bring this product back to Singapore?! A lot of girls out there would be eternally grateful for that!
Girls, if you are keen to get this product, it is still available in JB's Watson stores as that was where I got mine last week. Else, you can also get it from Qoo10 at a much steeper price (SGD 40 plus?! Qoo10 whyyyyy??) so my suggestion is to get it from JB instead or if someone you know is going over, get them to purchase one for you and you can save a lot more money this way. 


I hope you've enjoyed reading this post and happy shopping away!

XOXO

Sunday 10 September 2017

NEIGHBOURHOOD + OOTD = PERFECT!

Hello guys!

Today, I'll be sharing with you some tips on how to make use of your neighbourhood surroundings as a good spot for your outfit of the day (OOTD) shots. Also, I will be sharing some tips on how to take good photos and how to pose like Gigi Hadid (just kidding, but she is my Goddess). If you are like me who loves taking OOTD shots but are not sure how to perfect it, read on below.  

Tip #1: Always bear in mind that natural lighting is your bff when taking photos. A simple trick to test if you are facing the sunlight is to raise your palm in the air and see if the front or back of your palm is brighter. If the back of your palm is brighter then the sunlight is coming from behind you and if the front of your palm is brighter then you are facing the light! Easy right?

Tip #2: Avoid taking photos at noon because the sunlight is the harshest during that period (unless you wanna look like Justice Bao (包青天) then by all means).

Tip #3: With the aid of the lighting around you, all you have to do is just be yourself. Don't ever force yourself to smile or pose like someone else because like they always say - confidence is your best outfit!

So next, I am also going to share with you some tips I use when it comes to posing in front of the camera. 

I like to keep my hands busy when taking photos so as to avoid letting my hands look empty and that would potentially be really awkward. It could be as simple as putting your hands in the pockets of your bottoms or holding something in your hands like a cuppa coffee from Starbucks or just your handphone. 

As you can see from my photo below, I kept my hands busy by pushing/holding the leaves of a tree I found in the neighbourhood. For a shot like this, I recommend doing a half body one instead so that the focus is on your face among the surrounding greenery.  

Don't stop beleafing.
My next go-to pose would have to be the "take a stride" pose. It is one of the easiest and most candid pose ever. You will never look like you are trying too hard to do a supermodel pose. Do remember to take big strides when you are attempting this and also do them in slow motion so that your photographer can easily time the right moment to capture the perfect shot. 

My back to school outfit
When you run out of ideas for a pose, find something to lean against. It could be a wall, a tree or even the stairs like how I did it in the photo below. When you are leaning against an object, your body will be less tense as opposed to standing upright and you will give off a more relaxed vibe, thus looking more natural. 

Put your hand in front to cover your tummy yet looking so natural
Last tip in this photo is to remember to cross your legs and do a slight tip toe so as to create an optical illusion to show that you have longer legs. 
I have also incorporated the first tip in the photo below to make myself look busy by holding onto a book.
Bookworm alert!

And so this concludes my post on how to make full use of your neighbourhood to achieve great OOTD shots! I hope you've enjoyed reading this and start shooting away! 

XOXO


Sunday 3 September 2017

Instant Mala Hotpot: Yay or Nay

Hello guys, welcome back to my blog!

So in today's post, I am going to guide you through the process of making the very popular instant Mala hotpot or they called it the 懒人锅 (lazy men's hotpot) and I will share with you how I felt about it, whether I think it is worth buying or is it just a gimmick.

Without further adieu, let's get started! What you will be seeing later in this post is a series of videos on how we prepared the hotpot.

I bought this instant hotpot from KSL Mall in Johor Bahru for RM25 (approx. $8) and this is the cheapest I can find. Q0010 is selling this at $14 per box so if you can't travel to JB you can also get it from Q0010 as well! 


I got the Halal one and it came with a packet of quail eggs, a beef sausage, potatoes and black fungus, together with vermicelli, the soup base and a heating pack. It is stated on the cover that one box can serve up to two pax sufficiently. Once you open the cover, there is a step by step cooking instructions which are all printed in Chinese. 


Basically, it tells you to pour the soup base paste first on the top layer of the box followed by all the other ingredients that come together with it. 


So after you have put all the ingredients on the top layer, pour water in based on the amount of soup you would like. After that, pull out the top layer and place the heating pack on the bottom layer as shown in the video below. PLEASE DO NOT open up the heat pack ar it may cause an explosion!


Moving forward, once you place the heat pack into the bottom layer of the box, pour just enough cold water (must be cold water!) over the heat pack to cover the entire heat pack and then quickly place the top layer of the box back and cover it up with the lid. You will hear a boiling sound coming out almost immediately from the box and you will also see steam coming out from the small hole on the lid!


After fifteen minutes, your food is ready to be served. Do note that at this point of time, the lid is extremely hot so do be careful when you open the lid. 

Pour the last packet of chilli oil into the box, stir it well and you may tuck in!


Verdict: I swear this hotpot is super duper spicy and numbing! It's way spicier than Haidilao and I almost couldn't finish it. The smell was really weird (I think it's because of the beef oil paste that they used for the soup base) and I really hated the smell. The potatoes were hard as they were not soaked in the soup long enough. I couldn't really taste anything other than the spiciness as my tongue went numbed after having my first sip of soup. 
All in all, this hotpot just wasn't my cup of tea and I would rather spend more money on the real deal. The ingredients tasted really "instant" so in conclusion, this is a nay for me. However,  you can still buy it to experience the cooking process yourself but do not have high hopes for it to taste like haidilao.


So that completes this post! Leave a comment and let me know what other food products you want me to review on and I'll see you in my next post.

XOXO