Hey Readers, welcome back!
In today's post, I'll be sharing more photo spots in Perth City, Western Australia so if you are planning a trip to Perth, I highly recommend you to check these places out!
First Photo Spot: Wolf Lane (CBD district)
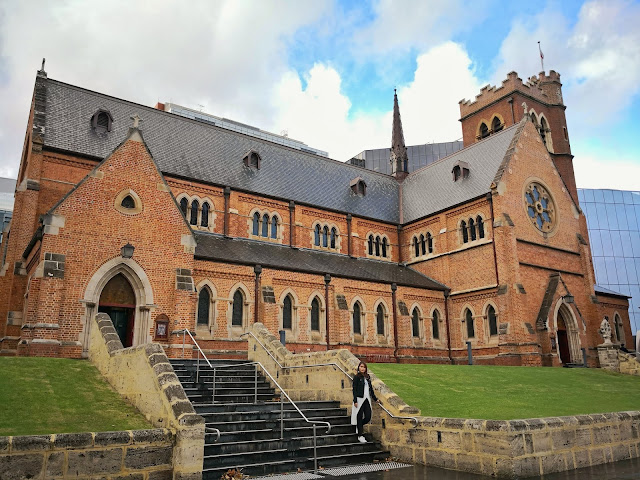
Second Photo Spot: St George’s Cathedral (walking distance from Wolf Lane so you may want to check them out together)
Third Photo Spot: Fremantle Arts Centre
Fourth Photo Spot: Bathers Beach Public Changing Room (also @ Fremantle)
Fifth Photo Spot: Rainbow Containers
Sixth Photo Spot: Raeburn Orchards
So that's all I have for Perth. I hope that these two posts on Western Australia will give you a better idea on how to plan your itinerary.
See you in my next post, xoxo.
Hello guys! My name is Jingwen and I reside in sunny Singapore. I am the typical girl next door who loves to share her passion for makeup and fashion with everyone. So stay tuned to this space and click the follow button as there will be new updates on a daily basis! XOXO ����
Followers
Thursday, 31 May 2018
Monday, 28 May 2018
Where To Take Insta Worthy Photos: Western Australia (Part 1)
Hey Readers, welcome back!
In today's article, I'll be sharing some photo spots in Western Australia (WA) so if you are looking to travel there, this article may be of some help to you.
First Spot: The Wave Rock (approximately 3hrs drive from Perth City)
Fourth Spot: Greens Pool (In Denmark)
Fifth spot: Sugarloaf Rock
That's all for this post and I will be doing the part 2 (sequel) to this in my next post so stay tuned for more photo spots in WA.
Xoxo
In today's article, I'll be sharing some photo spots in Western Australia (WA) so if you are looking to travel there, this article may be of some help to you.
First Spot: The Wave Rock (approximately 3hrs drive from Perth City)
Second Spot: Hippo's Yawn (right next to the Wave Rock)
 |
| Can you tell why it's called the Hippo's Yawn? Third Spot: Gap And The Natural Bridge (30min drive from Albany) |
That's all for this post and I will be doing the part 2 (sequel) to this in my next post so stay tuned for more photo spots in WA.
Xoxo
Wednesday, 16 May 2018
Where To Take Insta Worthy Photos: Gillman Barracks
Hey Readers, welcome back!
In today's post, I will be bringing you to the latest Instagram sensation at Gillman Barracks - Disini Exhibition.
"Disini" comes from the Malay adverb which means right here and this exhibition right here at Gillman Barracks showcases a series of outdoor artworks by both local and international artists and I guarantee you an eye opening experience, not forgetting all those potential Instagram worthy photos that you can take there.
A Rock Is A River, Maya Rochat, Blk 10 toilet:
 |
Nenas Estate, DISINI Pavilion, MASH-UP, beside Blk 7: |
|
Hati Dan Perasaan, Orkibal, behind Blk 9:
 |
Chromodynamica for Singapore, Felipe Pantone, Blk 7 |
Tuesday, 8 May 2018
Review: The Ordinary Coverage Foundation
Hey Beauties, welcome back!
In today's post, I will be doing a short review on the latest foundation that I have been trying and testing on - The Ordinary Coverage Foundation. Many of you may not have heard of this brand because it is not readily available in Singapore's beauty stores like Watsons, Guardian or Sephora. However, I came to know about this brand when my favorite Youtuber Kathleenlights shared about her love for this foundation and it was even featured in one of her monthly favorites video. I will put a link to the website I got this foundation from down below, just in case you girls need it.
 |
| This is how the bottle looks like. |
Recently, I have been reaching out to this foundation almost everyday ever since I started to use it mainly because of its staying power. It literally lasts whole day on my face (7am-10pm) without any touch-up in between. I was blown away by how long lasting it was when I first wore it to work. My face did not look cakey or greasy after a whole day at work and this surprised me a lot since I have combination oily skin and my t-zone usually looks shiny after awhile when I use some other foundations. So, five stars for its staying power! However, if you have very dry skin, you might want to give this foundation a miss as I feel that it can be quite drying for dry skin (which probably explains why my face doesn't look greasy at all).
 |
| After a layer of the foundation, skin tone becomes even and I can hardly see my dark eye circles. Amazing. |
 |
| Took this during mid-day and the foundation together with my makeup is going on strong! |
I got myself the shade in 1.2 N Light in which N stands for Neutral as I usually prefer a foundation that is one shade lighter than my original skin tone so that in any case that the foundation oxidises, I will not look fifty shades darker in the mid-day. There is a total of 21 versatile shades for this Coverage foundation but the website that I got it from only has 5 shades for you to choose from: 1.2 N Light, 2.0 N Light Medium, 2.0 P (Pink) Light Medium, 2.0 Y (Yellow) Light Medium and 2.0 Y Medium. I believe the first two shades would suit most Asian skin tones but if you prefer a cooler shade, you can also go for 2.0 P Light Medium for a cooler undertone.
Last but not least, The Ordinary Coverage Foundation also comes with a SPF15 mineral sun protection so for girls who tend to skip the sun block, this is the foundation for you as it protects your skin while looking perfect.
 |
| And at the end of the day, my skin still looks so flawless. Thumbs up for this foundation! |
Happy shopping, xoxo.
Saturday, 5 May 2018
How I Style: A Basic Tee
Hey Beauties, welcome back!
Being a blogger means I have to constantly create new content for my readers out there and after brainstorming for a while , I have decided to do a series of "How I Style" in this space and today's post will be the first ever article of the series.
In this article, I will be doing a "How I Style - a basic tee" . I am sure many of you are like me, who love to wear basic tees but at the same time you don't wish to look too 'lok kok' (casual). Fret not, I have come out with 5 ways to wear a basic tee where you can look trendy and chic so read on to find out more.
The first style that came to my mind is to pull on a trustee pair of jeans but instead of looking like a plain Jane, I added a little spice to this outfit. I decided to put on a pair of heels. This addition makes the entire outfit a tad more feminine and I feel that this could be a perfect outfit for a girls night out if you want to look slightly casual yet feminine.
The second outfit is somewhat a similar to the first one as I was wearing the same pair of jeans from the first outfit. However, I went a little further to create a denim on denim look by simply throwing on a denim jacket on top of my 'normal' outfit. Personally, I feel that denim on denim will never go out of fashion as it brings out a little attitude in your dressing. This can be a good outfit if you are in the mood for an ootd shoot.
Outfit number 3 is more office-friendly style. What I've done here is put on a pair of maroon work pants and make sure I tuck my tee in for a sleek and tidy look. To complement the look, I added a blazer to complete this 'office lady style' . I absolutely love how versatile this outfit is and will definitely recommend this if you have special occasions to attend.
The fourth outfit is, in my opinion, the girliest of the lot and I must say, it is super effortless. Just put on a slip dress over the tee and wear the most comfortable pair of sneakers you have and you are good to go! I decided to pair this with a denim slip dress since denim looks good with almost any colour. This is definitely an outfit suitable for a date with your Mr. Right.
The last style I am going to share is undoubtedly the most common yet stylish combination: a basic tee with literally any kind of skirt. Yes, you read that right. In the photo below, I matched my tee with a semi formal midi skirt and it instantly gave me a smart casual look. Slip on a pair of kitten heels and you are bound to make heads turn.
Well, that's all I have for this first article of 'How I Style'. I hope you have enjoyed reading this and don't forget to stay tuned for the next article!
Happy styling away xoxo.
Thursday, 3 May 2018
Haul: Sephora Private Sale
Hey Beauties, welcome back to my blog! I am so excited to be sharing with you what I bought from the Sephora Private Sale so stay tuned if you are curious to find out too. I did not buy a lot from this sale because I will be travelling quite a bit this year and I thought I should save up a bit.
Anyway back to today's topic, first item on the list is my all time favorite Clinique Clarifying Lotion 3. I had recently finished a bottle of this Clarifying Lotion and have been wanting to repurchase it. This Clarifying Lotion is the second step in the Clinique's Three Step Skin Care System and the number behind refers to the skin type it is suitable for. For me, I go for their number 3 as it is for combination oily skin but if you have very dry skin you should go for 1; if you have combination dry skin, you should go for 2 and if you have very oily skin, you should go for 4. I love how this Clarifying Lotion manages to keep my face clean and oil free. Definitely recommending this to all combination oily skin readers out there.
 |
| Photo taken from Clinique.com |
 |
| Photo taken from Pixibeauty.com |
 |
| Photo taken from Sephora.com |
 |
| Photo taken from Nyxcosmetics.com |
 |
| Photo taken from Sephora.com |
Subscribe to:
Comments (Atom)


